
If your Windows 11 laptop used to feel responsive but now stutters when you open a browser, switch apps, or wake it from sleep, you do not need to guess what went wrong.
A sluggish laptop is rarely an unexplainable issue. In most situations, performance drops because specific hardware resources—the processor, system memory, solid-state drive, or cooling capacity—are operating under heavy software demand or thermal constraints.
This guide is written for anyone experiencing sudden lag, delayed boot times, high fan noise, or frozen windows on Windows 11. Instead of applying speculative registry tweaks or downloading unverified utilities, you will walk through a structured diagnostic sequence to isolate the exact bottleneck and resolve it safely.
Short Answer: Where to Start Safely
If your laptop suddenly feels sluggish, the safest starting point is a complete system restart followed by an immediate check of Task Manager:
-
Click Start, select the Power icon, and choose Restart. (Avoid choosing Shut down, because Windows 11 Fast Startup preserves the current kernel session state on disk rather than reloading a completely clean session).
-
After Windows reboots, press Ctrl + Shift + Esc to open Task Manager.
-
Check the Processes tab to see whether CPU, Memory, or Disk utilization is pinned near 90% to 100%.
Identifying which column is saturated immediately transforms an ambiguous slowdown into a specific, manageable diagnosis.
Identify Your Symptoms: What Type of Slowdown Are You Experiencing?
Different symptoms point to entirely different system constraints. Before changing system settings, match your symptoms to one of these five common profiles:
-
Delayed boot and sluggish desktop loading: The laptop takes minutes to reach the desktop, or the desktop appears but remains unresponsive while background services load.
Primary suspect: Bloated startup applications or an aging mechanical hard drive.
-
Lag and freezing during multitasking: Switching between browser tabs or office applications causes freezes, stuttering, or tab reloading.
Primary suspect: Insufficient physical RAM or background memory exhaustion.
-
Persistent 100% disk activity and slow file opening: Opening File Explorer, saving documents, or searching files takes an unusually long time.
Primary suspect: Low SSD storage headroom, background file indexing, or failing drive hardware.
-
Sudden stuttering accompanied by hot vents and loud fans: The laptop runs quickly for 10 to 15 minutes, then abruptly stutters while the chassis feels hot and internal fans spin at maximum speed.
Primary suspect: Thermal throttling of the CPU or GPU.
-
Sluggish performance only when unplugged: The laptop runs normally when connected to the charger but feels significantly slower as soon as it runs on battery power.
Primary suspect: Windows 11 battery saver profiles or aggressive manufacturer power-capping policies.
Common Causes of Windows 11 Laptop Slowdowns
Modern laptops handle everyday computing smoothly unless constrained by one of the following factors:
-
Unmonitored background tasks: Startup utilities, game launchers, sync clients, and updater services running continuously behind the scenes.
-
Thermal throttling: When dust blocks heatsinks or thermal paste degrades, the processor automatically reduces its clock speed to avoid overheating.
-
Storage saturation: Solid-state drives (SSDs) lose write efficiency and wear-leveling performance when filled beyond 80% to 85% of their total capacity.
-
Aggressive power profiles: Energy-saving modes deliberately cap CPU frequencies to prolong battery life.
-
Corrupted system binaries: Interrupted updates or disk errors can leave system components damaged, causing Windows subsystems to get stuck in processing loops.
-
Malware or illicit mining scripts: Unwanted software utilizing system hardware in the background.
Preliminary Checks Before Changing Settings
Before modifying system configurations, rule out simple operational factors:
-
Perform a true Restart: As noted, Windows 11 utilizes “Fast Startup” by default, which hibernates the system kernel during a standard shutdown. A manual Restart forces Windows to close all active processes, flush temporary system state files, and reload drivers cleanly.
-
Connect the original AC adapter: Ensure the charger delivers adequate wattage. Third-party USB-C chargers with lower wattage ratings often cause modern laptops to operate in low-power throttling states.
-
Check for an active Windows Update installation: Open Settings > Windows Update. If Windows is currently downloading, unpacking, or installing a major feature update, temporary disk and CPU usage will be high until the installation completes.
-
Inspect your internet connection: If the slowdown is isolated to opening web pages or loading cloud documents, the issue may stem from network congestion rather than computer performance. If you encounter network connectivity drops, refer to our step-by-step guide on why Windows says connected with no internet to verify network adapter functionality.
9 Diagnostic Checks and Fixes
Work through these checks in order. Each check explains how to inspect the issue, what the data means, and the exact steps to resolve it.
Check 1: Inspect Background Resource Hogs in Task Manager
Your first diagnostic step is identifying whether a rogue application or service is consuming an excessive share of CPU cycles, memory, or disk bandwidth.
How to Check:
-
Press Ctrl + Shift + Esc to open Task Manager. (If it opens in compact view, click More details at the bottom).
-
On the Processes tab, inspect the aggregate percentages at the top of the CPU, Memory, and Disk columns.
-
Click any column header showing sustained usage above 80% to sort processes from highest to lowest.
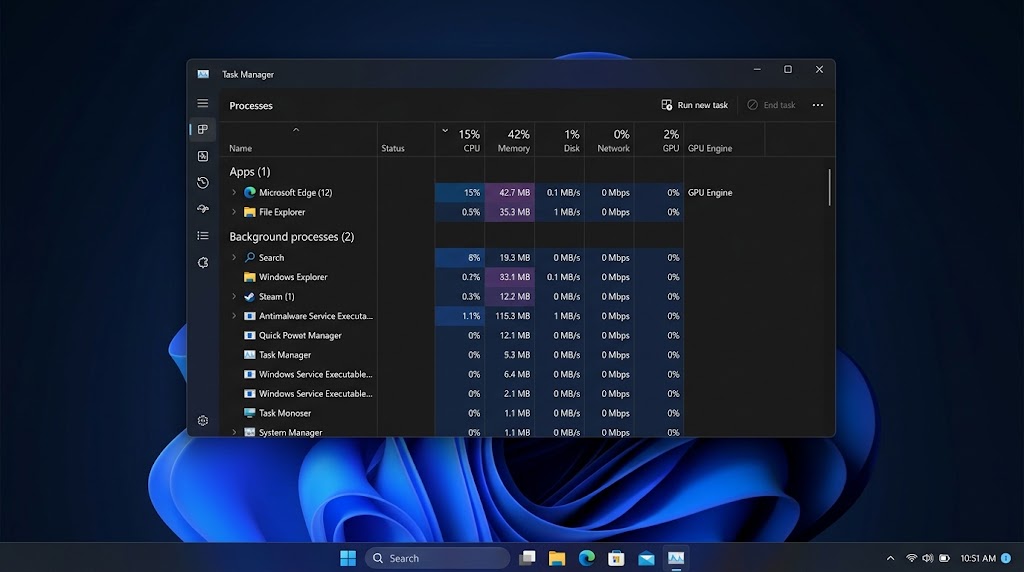
Figure 1: Task Manager Processes tab displaying CPU, Memory, and Disk utilization percentages to pinpoint resource-heavy background tasks.
What It Reveals and How to Fix It:
-
High CPU usage by a user application: If an open browser or software tool consumes 60%+ CPU while idle, an unresponsive background tab, misbehaving extension, or script loop is likely the cause. Right-click the process and select End task, then inspect browser extensions.
-
High CPU usage by Windows processes (e.g.,
SystemorWmiPrvSE.exe): This often indicates driver conflicts or an internal service trapped in an error loop. Note the process name before terminating it. -
High Memory usage: If memory exceeds 85% with only a few basic apps open, you may have applications leaking memory or an overall physical RAM capacity insufficient for your workload.
Check 2: Audit and Disable High-Impact Startup Apps
Applications that launch automatically during boot remain resident in memory, consuming CPU cycles and prolonging startup times.
For official guidance on managing boot items, consult Microsoft’s documentation on configuring startup applications.
How to Check:
-
Open Task Manager (Ctrl + Shift + Esc).
-
Click the Startup apps icon in the left navigation bar (represented by a speedometer icon).
-
Review the Startup impact column, which categorizes apps as High, Medium, Low, or None.
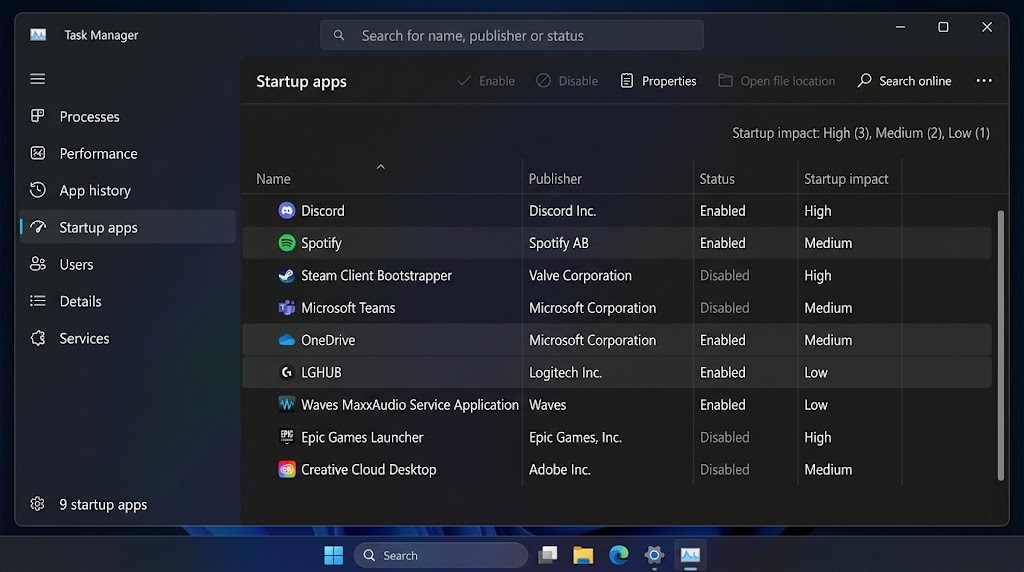
Figure 2: Auditing the Startup apps list in Windows 11 Task Manager to disable high-impact programs and decrease boot delays.
What It Reveals and How to Fix It:
Utilities like cloud storage updaters, chat clients, game storefronts, and third-party accessory managers often register themselves to run on boot, adding 30 to 60 seconds to your startup sequence.
-
Identify non-essential apps with High or Medium impact.
-
Right-click the application and select Disable.
-
Safety note: Leave core hardware utilities—such as your audio driver control panel, touchpad software, and security software—enabled. Disabling an app here only prevents it from launching at boot; it remains fully functional when opened manually.
Check 3: Audit Free Drive Space and Clean Temporary Files
Solid-state drives (SSDs) require free space to execute wear leveling, garbage collection, and write amplification management. When an SSD drops below 15% to 20% free capacity, write speeds decline dramatically, causing general system hesitation.
How to Check:
-
Press Windows Key + E to open File Explorer.
-
Select This PC from the sidebar and view the progress bar under your primary Local Disk (C:).
-
If the bar is red or shows less than 20 GB of free space, your drive is congested.
How to Clean Safely Using Windows Storage Sense:
-
Open Settings (Windows Key + I) and navigate to System > Storage.
-
Toggle Storage Sense to On to allow Windows to periodically clean out unnecessary system and app temporary files.
-
Click on Temporary files in the storage breakdown list.
-
Review the selections. Check Temporary files, Thumbnails, and Delivery Optimization Files.
-
Caution: Inspect the Downloads folder checkbox before proceeding. If you keep important files in your Downloads folder, uncheck it to avoid accidental data loss.
-
Click Remove files.
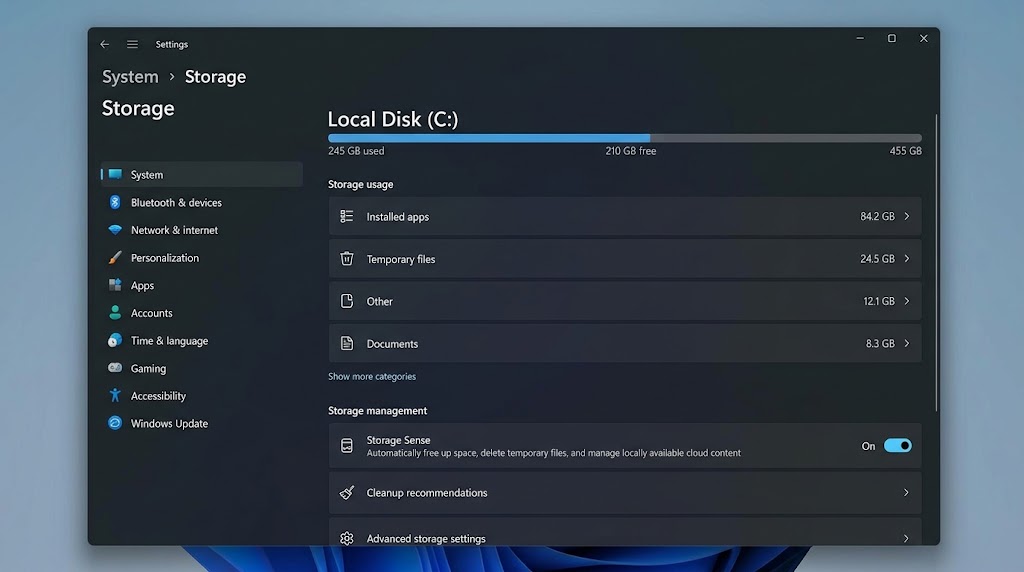
Figure 3: Reviewing drive capacity, temporary files, and enabling Storage Sense under Settings > System > Storage.
Check 4: Check Windows Power Mode and Battery Saver Limits
Laptops manage energy aggressively. If your Windows power mode is locked into an efficiency profile, your CPU will operate at reduced clock speeds even when plugged into the wall.
How to Check:
-
Open Settings (Windows Key + I).
-
Go to System > Power & battery.
-
Locate the Power mode dropdown menu.
What It Reveals and How to Fix It:
-
If the dropdown is set to Best power efficiency, Windows prioritizes battery preservation over responsiveness, frequently limiting multi-core boost frequencies.
-
Change the dropdown to Balanced for standard daily tasks, or switch to Best performance when performing resource-intensive tasks while connected to AC power.
-
Scroll down to the Battery saver section. Verify that battery saver is not set to turn on permanently or at an unusually high battery percentage (e.g., 50%).
Check 5: Monitor Temperatures and Check for Thermal Throttling
When a laptop’s cooling assembly cannot expel heat fast enough, the processor engages thermal throttling, reducing clock speeds from several gigahertz down to base or sub-base frequencies (such as 0.79 GHz to 1.1 GHz) to prevent physical hardware damage.
How to Check:
-
Open Task Manager (Ctrl + Shift + Esc) and select the Performance tab on the left.
-
Select CPU.
-
Observe the Speed field beneath the utilization graph under load.
-
If your laptop feels hot to the touch, the internal fans are spinning loudly, and the CPU frequency drops sharply below 1.2 GHz under modest loads, the system is thermally throttled.
How to Fix It:
-
Clear ventilation pathways: Never use the laptop on soft surfaces like beds, blankets, or couches that obstruct bottom intake vents. Place it on a flat, solid desk.
-
Elevate the chassis: Elevating the rear feet of the laptop by just half an inch improves airflow beneath the chassis significantly.
-
Clean the dust vents: Power off the laptop, unplug the charger, and use a can of compressed air directed at the intake and exhaust vents to dislodge accumulated dust from the heatsink fins.
Check 6: Check for Pending Windows Updates and Driver Conflicts
Outdated graphics drivers, missing chipset software, or incomplete update cycles frequently cause background service hangs.
Refer to Microsoft’s official guide to improving PC performance in Windows for foundational recommendations on update hygiene.
How to Check:
-
Open Settings (Windows Key + I).
-
Navigate to Windows Update.
-
Check for any failed update attempts or pending restart notices.
-
Click Advanced options, then select Optional updates.
What It Reveals and How to Fix It:
-
Pending restarts: If an update has downloaded and is partially configured, background update agents will reserve disk I/O and processor capacity until the machine reboots. Click Restart now.
-
Outdated display and chipset drivers: Expand Driver updates under Optional updates. If you see system manufacturer firmware, Intel/AMD chipset drivers, or graphics updates, check them and click Download & install. Alternatively, install graphics updates directly through official vendor software (Intel Driver & Support Assistant, AMD Adrenalin, or NVIDIA GeForce Experience).
Check 7: Run Windows Security to Rule Out Malware and Cryptominers
Malicious background processes—such as silent coin miners and adware injectors—deliberately consume processor and network bandwidth while attempting to disguise themselves in the process tree.
How to Check and Fix:
-
Open Settings and select Privacy & security > Windows Security.
-
Click Virus & threat protection.
-
Under the Current threats header, click Scan options (do not click Quick scan).
-
Select Microsoft Defender Antivirus (offline scan) or Full scan.
-
Click Scan now.
What It Reveals:
An offline scan reboots Windows into a dedicated recovery environment, allowing Microsoft Defender to scan files before the operating system and any potential rootkits or obfuscated scripts load into memory. If threats are found, Defender quarantines them automatically.
Check 8: Verify System File Integrity (DISM and SFC Scans)
Corrupted system binaries from improper shutdowns, power loss, or interrupted update installations can cause built-in Windows services to crash repeatedly or consume excessive CPU time.
To verify the syntax and execution parameters, see Microsoft’s official guide to using System File Checker and DISM.
How to Run the Scans:
-
Click the Start button and type
cmdorTerminal. -
Right-click Command Prompt (or Terminal) and choose Run as administrator.
-
When prompted by User Account Control (UAC), click Yes.
-
First, repair the underlying Windows system component store by typing the following command and pressing Enter:
DOSDISM.exe /Online /Cleanup-image /Restorehealth -
Allow the tool to finish. It may appear paused at 20% or 60% for several minutes; do not close the window.
-
Once DISM finishes with a success message, scan and replace corrupted operating system files by typing:
DOSsfc /scannow -
Press Enter and wait for verification to reach 100%.
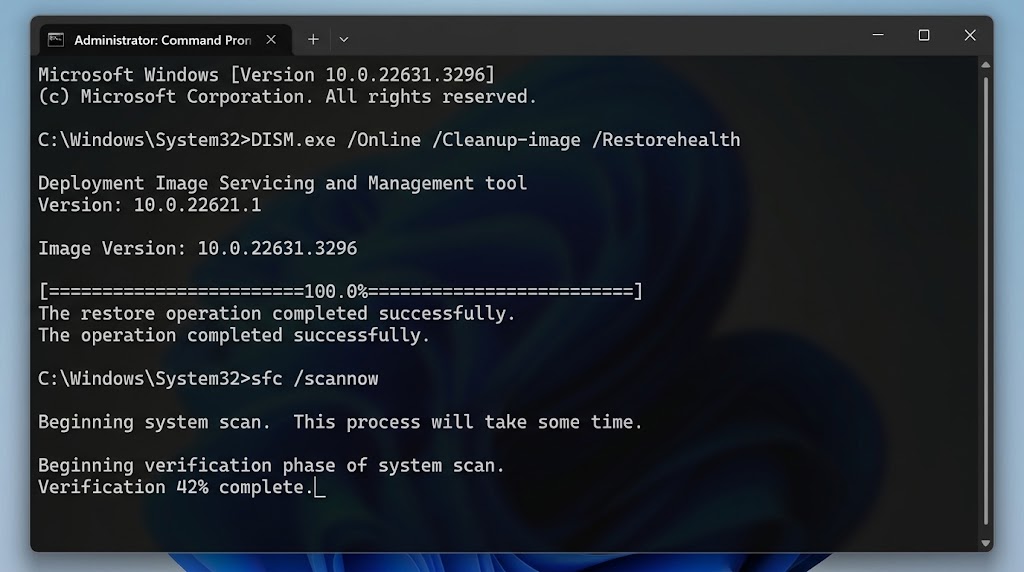
Figure 4: Executing DISM component cleanup and SFC file integrity verification in an elevated Command Prompt session.
Interpreting the Results:
-
“Windows Resource Protection did not find any integrity violations”: Your core system files are healthy; software corruption is not causing your slowdown.
-
“Windows Resource Protection found corrupt files and successfully repaired them”: File corruption was detected and corrected using cached clean files. Restart your laptop to finalize repairs.
-
“Windows Resource Protection found corrupt files but was unable to fix some of them”: The component store itself may require deeper repair or an in-place Windows upgrade.
Check 9: Evaluate RAM Allocation and Virtual Memory Pressure
When physical memory (RAM) is exhausted, Windows begins swapping memory blocks back and forth between physical RAM and the storage drive via the paging file (pagefile.sys). Even on fast NVMe SSDs, this memory swapping creates noticeable latency.
How to Check:
-
Open Task Manager (Ctrl + Shift + Esc) and go to the Performance tab.
-
Select Memory.
-
Review your total hardware memory (top right) and the Committed values (below the graph).
What It Reveals and How to Fix It:
-
The 8 GB threshold: Windows 11 combined with modern web browsers can consume 6 GB to 7 GB of memory with just a dozen tabs and basic background services open. If your laptop has 8 GB of RAM and usage constantly hovers at 85% to 95%, the system is constrained by physical memory.
-
Check the Committed metric: If your Committed memory (e.g., 18 GB) exceeds your physical RAM (e.g., 16 GB), Windows is actively relying on virtual memory on the storage drive.
-
Immediate remedy: Close unused browser tabs, terminate heavy background services, or switch to memory-efficient browser settings (such as enabling tab sleeping in Microsoft Edge or Google Chrome).
-
Permanent remedy: Check whether your laptop has upgradeable SODIMM slots. Upgrading from 8 GB to 16 GB—or 16 GB to 32 GB—delivers an immediate, sustained performance improvement for multitasking.
What to Avoid: 3 Common Troubleshooting Mistakes
When a computer slows down, well-meaning advice often recommends dangerous or counterproductive actions. Avoid the following:
1. Do Not Delete Unfamiliar System Files
Never navigate into C:\Windows or system directories to manually delete folders in an attempt to free up space. Removing critical components or shared DLL libraries can render Windows unbootable. Always use built-in utilities like Storage Sense and Disk Cleanup to clear cached files safely.
2. Do Not Blindly Disable Windows Services
Guides often recommend using msconfig to disable random Windows services under the guise of “debloating.” Disabling core background services—such as the Windows Event Log, Cryptographic Services, or Windows Defender services—causes system instabilities, update installation errors, and authentication failures. Leave native Windows services at their default configurations.
3. Avoid Third-Party “PC Optimizers” and Registry Cleaners
Software claiming to “speed up your PC with one click,” clean the Windows registry, or optimize RAM should be avoided. The Windows registry does not require routine cleaning, and third-party cleaners frequently delete valid keys, breaking application associations. Third-party “RAM boosters” simply force active working sets into the paging file, producing an illusion of free memory while actually degrading responsiveness.
How to Verify Performance Improvements
Once you have completed the checks above, verify whether performance has genuinely recovered:
-
Quantify boot-to-usable time: Restart the laptop and time how long it takes from the manufacturer splash screen until the desktop is responsive and able to open a browser without hesitation.
-
Review Task Manager baselines: With no foreground applications open, check Task Manager. Idle CPU usage should sit between 1% and 5%, and Disk usage should remain near 0% to 2%.
-
Test application responsiveness: Launch your primary browser and your most demanding work applications. Observe whether windows open promptly and window switching is fluid.
When the Problem Persists: Hardware and System Recovery
If you have completed all nine checks and the laptop remains noticeably sluggish, the root cause may be hardware-related or require operating system restoration:
-
Failing storage drive: Mechanical hard drives degrade mechanically, and aging SSDs can experience NAND degradation or controller failures. Download an official storage diagnostic tool from your SSD manufacturer (e.g., Samsung Magician, Crucial Storage Executive, or Western Digital Dashboard) to inspect SMART attributes and drive health.
-
Severely degraded battery: Some laptop models dynamically downclock the CPU if the internal battery cannot deliver stable voltage peaks, even when connected to AC power. Running a battery report (
powercfg /batteryreportvia Command Prompt) can reveal if battery capacity has collapsed. -
Windows Reset (Cloud Download): If your operating system installation has suffered irreversible software damage, perform a clean recovery. Go to Settings > System > Recovery, select Reset this PC, and choose Keep my files. Opt for Cloud download to ensure fresh, uncorrupted system binaries are fetched directly from Microsoft.
-
Professional hardware inspection: If the cooling fan has stopped spinning, internal thermal paste has dried completely, or the laptop exhibits thermal shutdowns, visit a certified technician for physical servicing.
Long-Term Prevention Checklist
To keep your Windows 11 laptop running efficiently over time, adopt these maintenance habits:
-
Maintain storage headroom: Keep at least 15% to 20% of your primary C: drive free of files.
-
Review startup entries quarterly: Check Task Manager > Startup apps whenever you install new software suites.
-
Restart weekly: Perform a true restart once a week to clear memory leaks and pending system updates.
-
Keep vents unobstructed: Clean cooling grilles with compressed air every few months and avoid operating on soft bedding.
-
Keep browser extensions minimal: Audit your browser extensions twice a year, removing add-ons you no longer use.
Frequently Asked Questions (FAQ)
Does adding more RAM always make a Windows 11 laptop faster?
Adding RAM only improves performance if your laptop is currently running out of memory. If your laptop has 8 GB of RAM and regularly reaches 90% utilization during daily tasks, upgrading to 16 GB will eliminate paging file bottlenecks and provide a noticeable speed boost. However, if your system already has 16 GB of RAM and rarely exceeds 50% usage, adding more RAM will not make individual apps or boot times faster.
Why does my laptop feel slower when running on battery?
Laptops balance performance with battery longevity. When disconnected from wall power, Windows 11 and your hardware firmware reduce the processor’s maximum clock speed, dim the screen, and throttle background tasks. To adjust this, go to Settings > System > Power & battery and adjust your Power mode to Balanced or Best performance, keeping in mind this will drain your battery more rapidly.
Is Windows 11 inherently slower than Windows 10?
On hardware meeting Microsoft’s official system requirements—including an 8th-generation Intel or AMD Ryzen 2000-series processor or newer, with an SSD and at least 8 GB of RAM—Windows 11 delivers comparable performance to Windows 10. However, Windows 11 utilizes more visual transparency effects and stricter security virtualizations (such as Memory Integrity / Core Isolation) by default. On unsupported hardware or entry-level devices with slow eMMC storage, these background protections can introduce perceptible latency.
Will resetting my laptop delete my personal documents?
Windows 11 offers two reset paths under Settings > System > Recovery > Reset this PC:
-
Keep my files: Removes installed desktop applications and custom settings while preserving files stored in your personal user folders (Documents, Desktop, Pictures).
-
Remove everything: Wipes the entire drive, deleting all applications, settings, and personal data.
Even when choosing Keep my files, it is essential to back up critical documents to an external drive or cloud storage before beginning any system restoration.
Can an outdated BIOS or UEFI firmware cause my laptop to run slow?
Yes. Laptop manufacturers release BIOS and UEFI updates to adjust CPU power delivery curves, optimize fan profiles, resolve thermal throttling thresholds, and correct hardware sleep states. Check your laptop manufacturer’s support portal or companion software (e.g., Lenovo Vantage, Dell Command | Update, or HP Support Assistant) to verify that your system firmware is current.
Conclusion: Your Safest Next Step
When troubleshooting a sluggish Windows 11 laptop, methodical diagnosis is always safer and more effective than random configuration tweaks.
Before making any permanent system changes, open Task Manager (Ctrl + Shift + Esc) and check your baseline resource consumption. Identifying whether the system is constrained by CPU spikes, memory saturation, or active disk operations gives you the clarity needed to apply the exact fix that solves the problem.